While workflows can be utilized to automate many different types of actions, email automation is one of the most essential lead nurturing features that HubSpot's workflow tool has to offer. A properly configured email workflow strategy can enhance your lead generation efforts and accelerate revenue growth.Here are 7 steps to execute flawless email nurturing workflows.
1. Identify Your Desired Outcome
Before anything else, it is essential to identify the action you want your prospects to take. The email content you create and the way you structure your workflow should work to persuade prospects to take this action. Do you want them to download a premium content offer? Register for a webinar? View a blog post? Whatever it is, make sure you have it narrowed down before you begin crafting your workflow strategy. We recommend creating a campaign in HubSpot to associate with this workflow to ensure you can effectively manage all the assets in this campaign.
2. Establish a Timeline
Based on your desired outcome, establish an appropriate timeline to run this campaign for. If your desired outcome aligns with a specific date like the airing of a webinar, your timeline will be fixed. Conversely, if you are creating an ongoing nurture campaign with no time-sensitive call-to-action, your timeline will be indefinite. Identifying your timeline for this campaign will enable you to create the proper amount of email assets and configure your workflow accordingly.
3. Craft Your Emails with Inbound Best Practices
Now that you’ve identified your goal and configured a campaign to track it with, it’s time to create your email assets. When drafting your emails, be sure to use compelling copy and visual assets that clearly state the value of your offer. Utilize HubSpot’s Call-to-Action tool to create a CTA that will persuade users to the desired action you defined earlier in your strategy. Most importantly, remember to set up additional attribution and reporting so you can see the holistic impact of your efforts. Lastly, remember to select “Publish for automation” for all of the emails you want to include in your workflow. We recommend utilizing a numerical naming convention to make your workflow configuration process a bit easier. Numbering your emails ensures that you are sending your them in the right order.

4. Determine Your Enrollment Trigger
The enrollment trigger is the criteria that a contact must meet to be enrolled in this workflow. To enable marketers to make the most of their workflow campaigns, HubSpot offers a wide variety of enrollment criteria. Contacts can be enrolled based on list membership, form submission, contact property or integration property, just to name a few.
If you’re not sure where to start, consider the contact properties of your ideal target for this campaign and use them as a foundation for your enrollment criteria. Use these properties to create a custom list of prospects and then use that membership of that list as your workflow enrollment trigger.
5. Select Your Actions and Configure "If, Then" Branches
Action branches represent the actions that the contacts enrolled in your workflow might take. In this case, you’ll want to select “Send Email.” From here, you can select from any of the emails you’ve published for automation. At this point, the numerical naming convention for your emails will be helpful to ensuring the emails are being sent in the proper order.
When selecting your actions, it is important to remember the goal of this workflow. What action do you want your prospects to take after viewing your email content? This desired action will determine the criteria of your “If, Then” branches. Essentially, “If, Then” branches are criteria that you can use to determine whether or not a contact has taken your desired action.
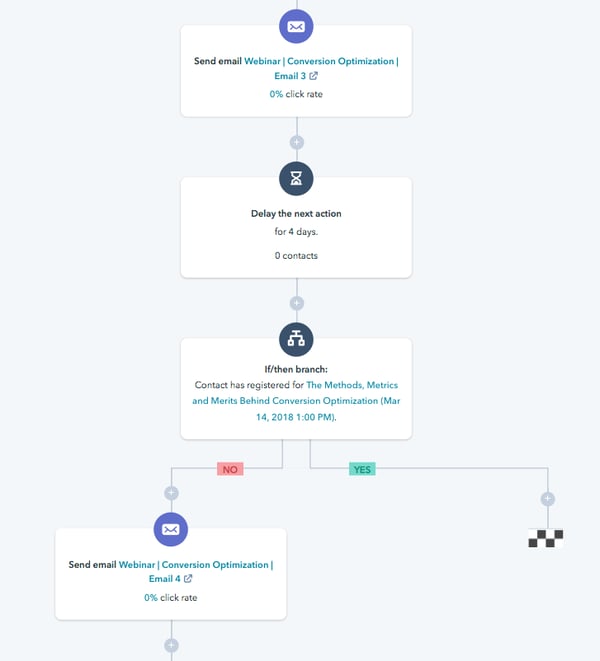
For example, if you’re sending promotional emails to urge prospects to register for a webinar, you don’t want to continue sending them emails asking them to register if they’ve already done so. “If, Then” branches allow you to screen your contact list to check if they have completed your desired action.
In the example pictured above, an email is sent, a four day delay occurs and then the contact list is reviewed with an “If, Then” branch that screens the contact list to see who has registered for the webinar. From there, it determines that those who have not registered for the webinar after receiving email 3 are to be sent email 4.
6. Set Appropriate Time Delays Between Actions
When executing an email workflow, it's essential to make sure that you are not bombarding your prospects with an excess of content. No prospect wants to receive an email every day, or even worse, multiple times a day. Avoid making this critical mistake by staggering your email sends over several weeks. In this case, time delays will be critical to ensuring that emails are being staggered properly. HubSpot allows users to set their time delays down to the exact minute, so be sure to plan out your delays in accordance with your desired timeline.
7. Consider Additional Settings
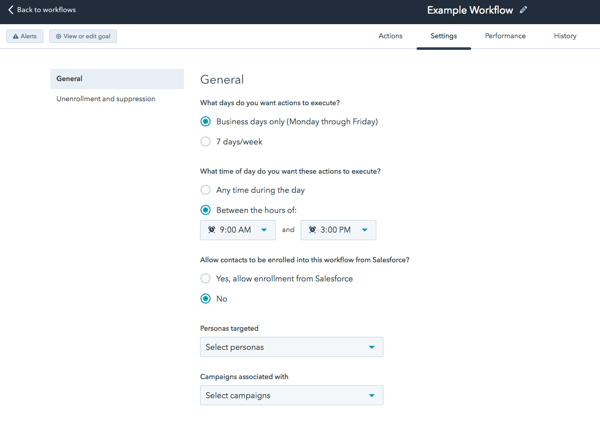
Once you’ve configured your actions and time delays, be sure to consider additional settings before turning your workflow on. Within the “Settings” tab in the workflow tool, you can adjust the settings accordingly. From here, you can associate your campaign with the workflow, select personas to target and create un-enrollment or suppression criteria.
If your goal is to reach business professionals, we recommend configuring the settings so that workflow actions will only execute on business days between working hours. Doing so will ensure that your content is being received at the times when your prospects are most likely to check their emails.
For more tips and tricks on how to get the most out of email marketing, download our checklist below.