.png)
Imagine you are a B2B company and you want to promote an awareness stage piece of content like a guide. You want to reach an audience of professionals that might be experiencing a common pain point, presenting a means for them to learn more about your topic and work toward your potential solution. If you want to target a specific audience, LinkedIn Ads offers a powerful promotional platform.
Setting up your first ad campaign on LinkedIn can be daunting, though. With that in mind, we created a step-by-step guide to creating a LinkedIn ad from scratch.
The 8 Step Guide to Creating a LinkedIn Ad Campaign
1. Create and connect your account
The first thing you need to do is create an account, name it and connect it to an existing LinkedIn page. From there, fill out your billing information and add a credit card to your account. Once that’s all set up, ensure you assign the proper access to team members who will be working on your ad campaigns.
Finally, you need a way to track your campaigns’ performance, so you should add the LinkedIn Insights tag to your account. If you’re familiar with Google Ads or Google Analytics tracking codes, the LinkedIn Insights tag is similar. It is simply a script of code that allows you to access in-depth campaign reporting, revealing valuable information about the people visiting your site.
2. Target your audience
Once your account is created and you’ve added the Insights tag, you want to start creating your campaigns. To do that, you need to determine who your audience is.
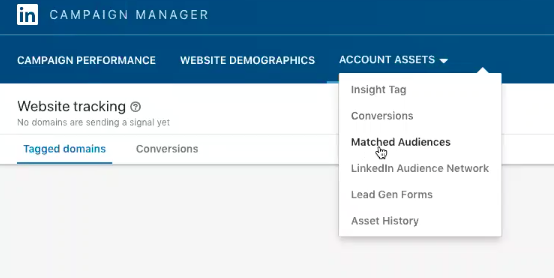
To start creating your audiences, go to your account and select the account assets tab at the top of the page. On the drop-down menu, select “Matched Audiences.”
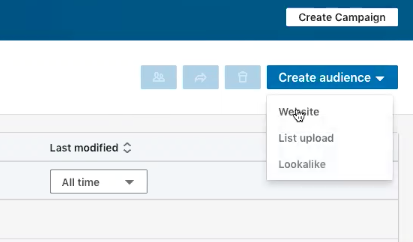
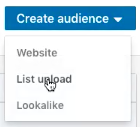
There are a few different audiences you can target: website audiences, list upload audiences and lookalike audiences. To choose which you want to create, click the “Create Audience” drop-down on the right-hand side of the “Matched Audiences” page.
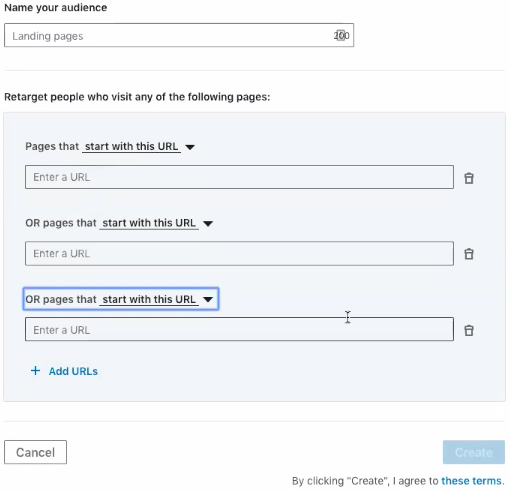
With website audiences, you can create an audience based on people who visit your website. For a guide or e-book, it would probably be wise to target anyone who visited the offer’s landing page or anyone that visited a blog post that was relevant to the guide’s topic. You can specify pages by adding URLs with OR statements on the website audiences page.
If you don’t want to target a website audience, another option is building a list upload audience.
There are two types of lists that you can upload in LinkedIn: account lists, which deal with companies, and contact lists, which deal with people.
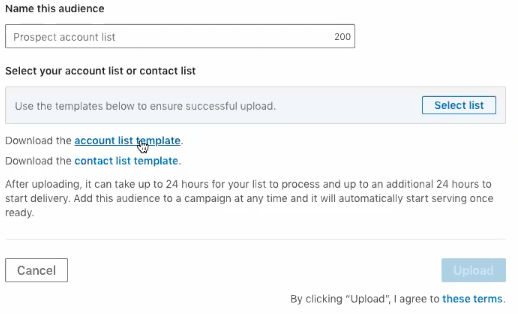
If you want to build an account list, you need to collect and organize a list of company names in an Excel sheet. That list should be structured in two columns. Column A should include company names (typed with no spaces), and column B should list company domains (also typed without spaces).
LinkedIn recommends a list size of at least 1000 companies, but generally including 500 to 1000 companies is fine. Basically, the larger your list size, the larger the pool of individuals that LinkedIn can show your ad to is. Overall, if your list falls within this range, they’ll charge you less money on a cost per click or cost per 1000 impressions basis because they’ll realize the same value had you targeted a smaller audience and they charged more. In general, the more granular your targeting becomes, the more expensive your ad engagement will be.
Contact lists are simply lists of individuals. They should also be structured in an Excel file. In the file, there should be one column labeled email with a list of emails directly under it. If the email you enter is associated with a user’s LinkedIn company profile, the ad will render for them. LinkedIn suggests contact lists have at least 10,000 individuals, but between 3000 and 5000 is fine. The same mindset applies to contact lists that applied to account lists, though — the more granular your targeting becomes the more expensive your engagements will be.
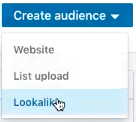
The last type of audience is a lookalike audience. When you create a lookalike audience, you specify an existing audience in your account, and LinkedIn scales it up based on the attributes shared among audience members. For example, if you upload a list of 1000 people, their LinkedIn profiles likely share similar attributes to other LinkedIn profiles not included in your list. Those attributes could include industry, job title and company among other aspects. LinkedIn can look at its database of users and pull similar accounts, creating an audience that looks like another that already exists in your account.

3. Build a Campaign and choose your objective
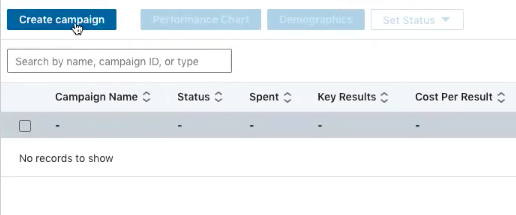
Once your audience is built, create a campaign to target it with. To do that, go into your account and click the “create campaign” button.
Then, name your campaign and set an objective.
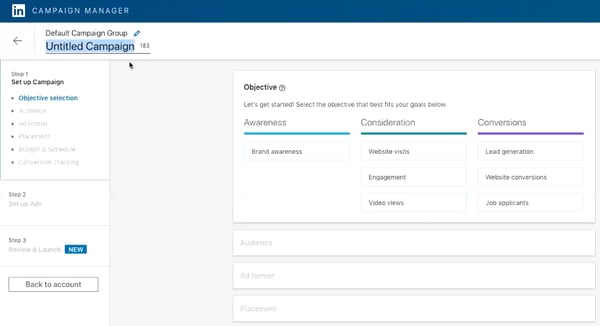
Choosing an objective actually changes the experience that users are going to have when they click on your ad. If you’re creating a campaign to promote an e-book, the two most fitting objectives for us to choose are website visits or lead generation.
If you use the website visits objective, individuals who click on your ad will be driven to a landing page. Alternatively, if you use the lead generation objective when someone clicks on an ad a form will pop up in their LinkedIn newsfeed. From my experience, the lead generation objective normally outperforms the website visits objective for e-books. Meanwhile, for bottom-of-the-funnel offers, like demo requests, website visit objectives tend to perform better. For our purposes, let’s select lead generation.
4. Refine your audience
Next, as you build your campaign, you can select your target audience. If you choose to build list-based audiences, like we walked through in step two, those can help you narrow a massive pool of people down to a more focused group. From there, using the audience attributes tool in LinkedIn’s campaign builder allows you to further narrow your audience using company, demographics, interest and persona, education and job experience information.
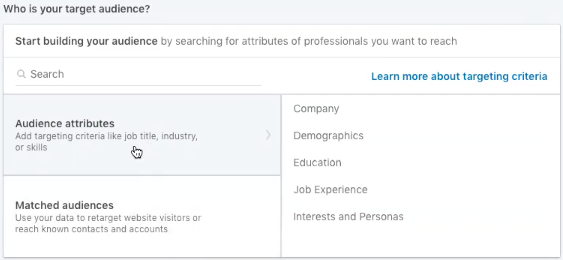
For example, if you wanted to target all of the companies in the Fortune 1000, you could use the account list upload to separate this subset of companies from all of the companies on LinkedIn. From there, you could use the audience attributes functionality to target people from such companies with specific job titles, skills or a large number of other factors. I find it’s usually most successful to use a two-pronged approach for audience-building, first leveraging a targeted list and then whittling that down to best match with your personas.
If you don’t have a list of companies or contacts to build a list off from, it’s often best to use three attributes to form an audience: company industry, job title and company size (in number of employees, not revenue). These attributes can often help you narrow your focus to a sufficiently-sized audience. For example, you might want to target companies with 500-plus employees within the hospitality industry that have marketing job titles.
5. Select your ad format
Once you build your audience, the next step in creating your campaign is selecting your ad format, of which there are four choices: single image ads, carousel image ads, video ads and message ads.
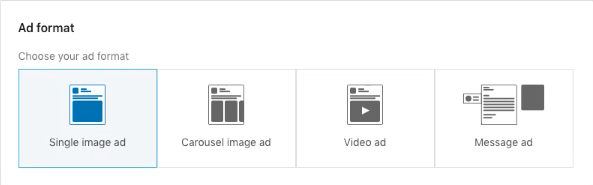
I find that carousel image ads and single image ads are the most successful formats. You can use video, but, if you are leveraging HubSpot and that’s your only way of capturing and tracking contact information, HubSpot’s ad tool does not have the capability to track contact attribution for video ads at this time. I also suggest avoiding message ads because they seem intrusive.
6. Set your budget
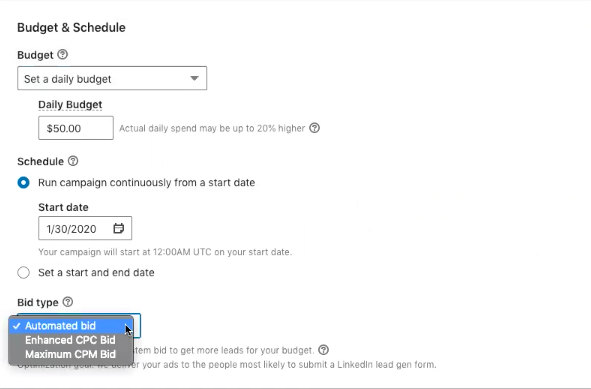
LinkedIn allows you to set a budget for your campaigns. Additionally, you can set a start date and an end date, giving yourself a set window to evaluate your ad’s performance. From there, you need to choose your bid type. There are three types of bids. With automated bids, LinkedIn uses previous campaign information and member data to set bids for you, so you can get your ads in front of the right people. With Enhanced CPC bids, LinkedIn gives you a range of bids and you set the maximum price you are willing to pay for each click on your ad. Similarly, with Maximum CPM, you set a maximum amount you are willing to pay for 1000 impressions on your ad.
Ultimately, you need to consider which bidding method makes the most sense for your campaign. If your goal is simply to get the most clicks on your ad for your given budget, choosing an Automated bid strategy makes sense. On the other hand, if your goal is efficiency of spend, you should use an Enhanced CPC or Maximum CPM strategy.
If you have high click and conversion rates, Maximum CPM probably makes sense. Instead of paying for each click, you will pay for impressions. If you garner many impressions and a large percentage of those people click and convert, you can often get more bang for your buck than you would with an Enhanced CPC strategy.
CPC strategies provide a great middle ground, allowing for a more controllable spend even when your click and conversion rates are still a work in progress.
7. Track conversions
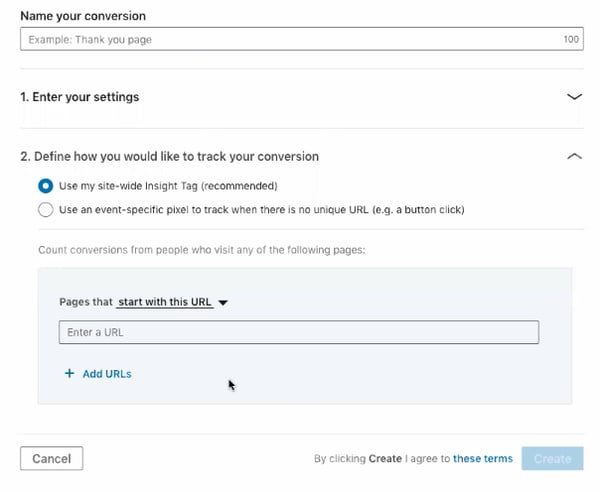
The next step to start your campaign is to set up conversion tracking. It’s much easier to do conversion tracking when you have a thank you page on your website. There are ways that you can use Google Tag Manager to track clicks on buttons, but I recommend using a thank you page. I feel it not only provides a better user experience, and it keeps users on your page longer.
![]()
To set it up, you name your conversion and insert the URL you want to use to track conversions. If you decide to use a thank you page, insert the thank you page URL. Every time a user goes to that URL, LinkedIn can tally that as a conversion.
8. Design and publish your ad
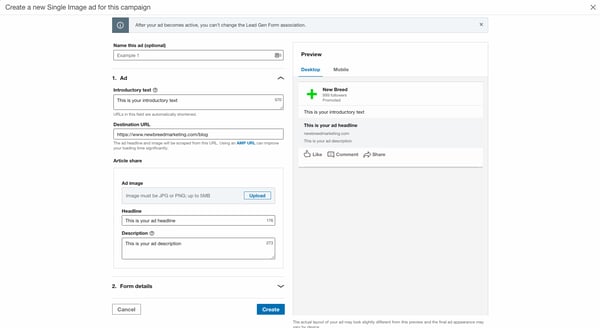
Finally, you need to design and publish your ad. LinkedIn will prompt you to include all of the necessary elements. To start, click the create ad button once you are finished setting up the rest of your campaign. If you are producing a single image ad, there are a number of fields you need to complete, including the name of your ad, the introductory text, the destination URL, the image ad, the headline and the description.
While the introductory text says you can include 600 characters, LinkedIn will display a “read more” button on your post for any text over 220 characters. Remaining below that character count is key because people are not likely to click the “read more” button, and you want to communicate your entire message to them.
If you are using the lead generation objective, a form will display directly in an individual’s LinkedIn feed when they click the ad. With that in mind, the destination URL is not actually a destination for people who click your ad. Nonetheless, a general rule of thumb is to insert the URL for the landing page users would have visited had you run a website visit campaign.
Of course, if you are creating an ad with a lead generation objective, you also need to design the form. This can be found under the “Form Details” dropdown.
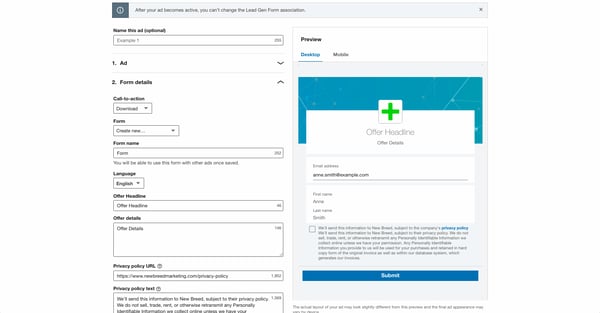
LinkedIn prompts you to add all of the necessary fields. It also requires you to select what type of call to action you want to use, whether you want to use an existing form or design a new one and which language you want to use. You will also need to provide a privacy policy.
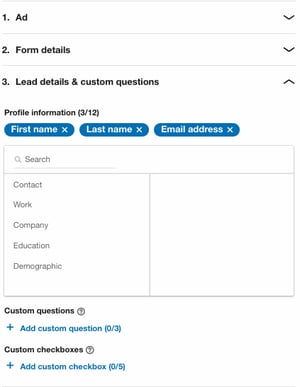
From there, under the “Lead details & custom questions” dropdown, you can fill out the text elements and select the form fields you wish to include in your form. Besides the pre-made form fields provided by LinkedIn, you can also create custom queries, asking questions like, “What is your biggest pain point?”
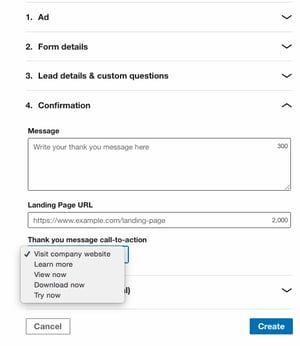
Finally, under the “Confirmation” dropdown, you can determine what will render for users after they fill out the form. This is the important part because you want to drive people to a thank you page that has a clickable CTA on it where they can access the guide or whatever you are promoting. If you try to send them directly to a PDF LinkedIn will flag your ad. You need to drive visitors to a landing page for them to access it.
Ultimately, LinkedIn lead generation ads promote a frictionless ad experience for the user. They never have to leave the platform to fill out the form, improving the odds that they fill out the form, hit submit and visit your site to access the offer.
Once your form is complete, you can review your work and click “Launch Campaign” to send your ad live.
Key Takeaway
Publishing your ad is definitely not the end of the story. From there, you need to track and optimize your campaigns. Here at New Breed, we use HubSpot to monitor the success of our LinkedIn ad efforts.
HubSpot allows you to dig into your conversions and the people behind them. You can track your contact’s interactions beyond their initial click and engagement. The platform even lets you determine the true return on investment of your campaigns, connecting with its deal tracking functionality to attribute revenue back to the source.
Overall, without a clear picture of the impact your ads are having, you won’t be able to tell if they’re worthwhile. Hitting publish is only the start.